It is very confusing when someone starts own blog like I was when I started mine. Many of my friends ask me how to create a blog so today I decided to write step by step a guide which can help others who are looking to have their blog. Nowadays, it doesn’t require any technical skill like HTML knowledge to start a blog.


P.S.: If you get stuck while setting up your blog, get in touch with me through contact page and I’ll help you out.
Here are prerequisites before you start a blog:
- First decide what are you going to blog about – some ideas are fashion blog, cooking blog, affiliate marketing, etc.
- Decide blogging platform – Even though there are many blogging platform but I would suggest wordpress as it is best platform and easy to install.
- Decide if self host or free host – Yes, even though wordpress can host your blog free, but nothing is really free.When you start a blog with a free blogging service, you don’t get your own domain. You get blog name something myblog.wordpress.com, which is similar to other millions of blogs hosted by wordpress so it would impact your site traffic.
Once you have decided on above three points then you can follow below steps:
How to setup free blog with wordpress?
1) First register at WordPress.

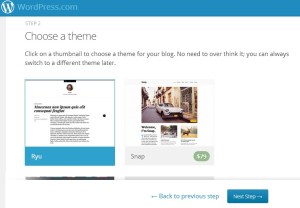
2) Choose a theme you would like to have:

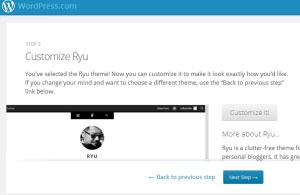
3) Customize your theme:

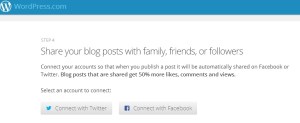
4) Share your blog with friends:

5) Create post:

6) Publish you post:
Once you have created your post publish it using publish now button and your blog would be online in no time. Here is my blog which I have created just now:

So, you can see that it took me only few minutes to set my free blog. You can also have your free blog in few minutes at WordPress.
How to setup paid blog with unique domain name?
If you want to have your own domain name for blog and want to self host it then follow below steps:
1) Decide a domain and hosting plan:
It may be a difficult task to find a good domain name, but once you have decided your blog topics then it should be fun to find out a domain for your blog.
How to find a domain name and how much cost is involved?
Your domain for site should match with topics you are going to write. If your blog is about fashion, and you choose domain name www.fashiontopics2013.com then it is not a good idea. But why?
People cannot remember long domain names and when they want to return to blog they are likely to forget your blog domain, which can impact your site traffic. A blog name should not have numerical values in it also it should be unique like www.fashionindia.com
In short, your domain name should be:
- Catchy
- Easy to remember
- Unique
There are lot of sites where you can buy your site domain but it is good idea to choose it from reputed site like Godaddy.
You can have your site domain name for cost of around $1.99 monthly and about $10 yearly as you’ll get discounts.
Once you got your domain, you’ll need web hosting to host your blog. I would again suggest to use Godaddy hosting as it is reliable and has best plans. Web hosting would cost you around $1 monthly and $10 yearly with discount prices.
Once you have got your domain and hosting plan then move to next step.
2) How to setup your blog using 1-click option at Godaddy:
You can use Godaddy 1-click option to install your blog without any manual intervention. You can follow instruction given at godaddy article Installing WordPress on Your Hosting Account.
3) How to setup your blog manually at any host:
In order to install your blog manually to any host, you need to know the following requirements:
- PHP 4.2 or greater
- MySQL 4.0 or greater
- At least 1GB free disk space
If your host meets the requirements(which Godaddy by default does), go and download WordPress from – http://wordpress.org/download
Once you have downloaded wordpress then unzip it properly, check that everything is unzipped in single folder otherwise your blog installation can fail.
Once files are unzipped, then find wp-config-smaple.php file and rename it to wp-config.php
After that open the file with Wordpad (or Notepad) and change the following lines:
define(‘DB_NAME’, ‘database_name’); — You’ll need to create database name by login in your hosting c-panel
define(‘DB_USER’, ‘username’); — It is your c-panel username or database username if you have set different while creating database
define(‘DB_PASSWORD’, ‘password’); —- It is your c-panel password or database password if you have set different while creating database
define(‘DB_HOST’, ‘localhost’); – In most cases you don’t have to change this. So at first you can leave it as it is.
Once you changed above file then you need to connect to your hosting FTP account; you will need a FTP client (for example, FileZilla) or you can use file transfer option in c-panel. If will need to login using username and password provided by your hosting company.If you upload the files to the root directory then your blog will be accessible from www.yourdomain.com. If you upload files to a specific folder (for example blog), your blog will be accessible from www.yourdomain.com/blog.
Here is some snapshot to explain above FTP process in better way:
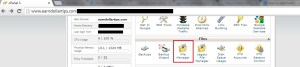
Create database using below mysql database option in c-panel:

Upload files by clicking file manager in c-panel and then use upload files in root directory or sub-folders:

Ok, so you are almost there. Now open your web browser and type in the following URL: www.yourdoomain.com/wp-admin/install.php
After that fill in the form (password, username and name of the blog) and click on the “Install WordPress” button. Once you get message that you blog is installed then login to your file-manager and delete install.php file, this is to avoid any installation by mistake in future.
After that fill in the form (password, username and name of the blog) and click on the “Install WordPress” button. Once you get message that you blog is installed then login to your file-manager and delete install.php file, this is to avoid any installation by mistake in future.
So finally, your blog is ready. Now login to your admin panel using URL: www.yourdoomain.com/wp-admin and start posting blogs.


No comments:
Post a Comment